Tonight we recovered a beagleboard! Many months ago we tried to install Debian and lost video and network access to the device. Obviously, U-Boot wasn’t able to boot the broken Debian install attempt.
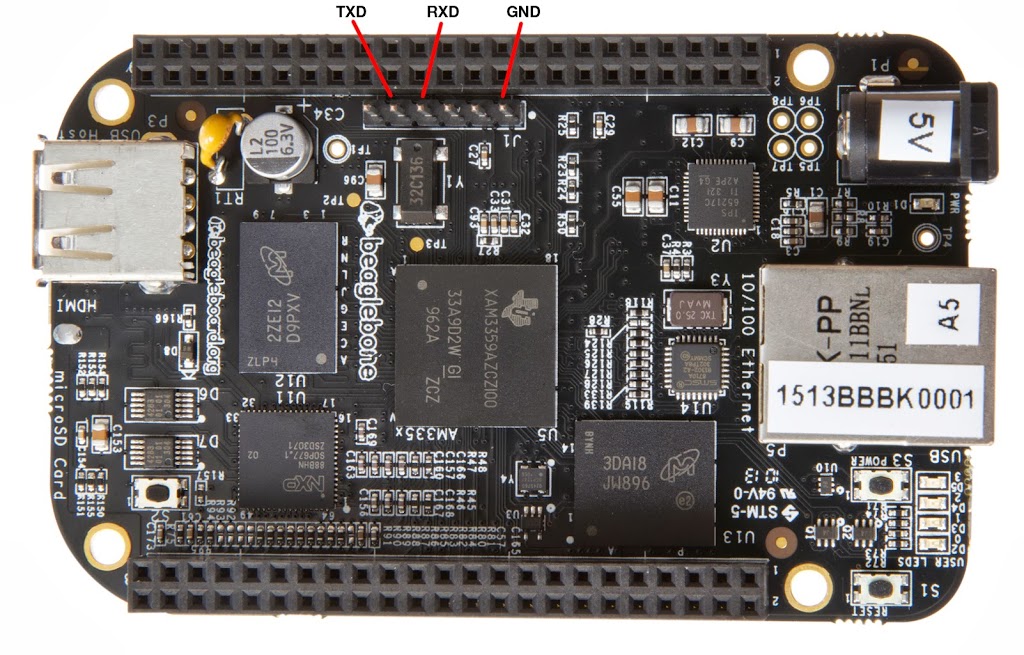 We attempted to re-flash using the SD card and that didn’t work. So, we thought it was broken at a deeper level and thought serial access would be helpful. A few meetings ago we attempted to build a serial cable that would interface with the BBB. We tried a standard rs232 serial cable and matched the pinout to the BBB board serial pins. Much continuity testing with a multimeter was required to match up pins. Yet, nothing we did worked. Then we realized that its not rs232 and is in fact TTL Serial (a description of the difference). Sam bought a TTL to USB controller and we used a ribbon cable and a breadboard to hook them up.

Once we successfully connected to the BBB over serial we saw the BBB was outputting the character “C”. CCCCCCCCCCCCCCCCCC…..
We asked on irc.freenode.net #beagle and the user magyarm told us that the C output means that the BBB can’t boot and all we need to do is re-flash the eMMC from a SD card. We previously had tried this and it didn’t work so the consensus was that we did it wrong. We retried the flashing of eMMC using the SD and we are happy to report a success!
We downloaded Robert Nelson’s Debian install image at http://elinux.org/BeagleBoardDebian#eMMC:_BeagleBone_Black
Then;
unxz BBB-eMMC-flasher-debian-7.2-2013-10-25.img.xz
dd if=BBB-eMMC-flasher-debian-7.2-2013-10-25.img of=/dev/sd[x] bs=1M
Then place the microSD in the BBB, hold down the boot button, apply power (use the power cord, because when flashing, the BBB consumes more power than the usb cable can provide), hold the boot button until the first LED comes on (this will boot from the microSD card). Wait for the bank of 4 LEDs to stop flashing and go solidly lit, it takes many minutes depending on the speed of your SD card. Once those 4 LEDs are solidly lit, the eMMC is flashed. Remove power, remove SD card and re-power on. It should now boot from internal eMMC!
Instead of blindly trying to flash, we had the serial output of the BBB and knew exactly what was going on the entire time! YAY! Instead of guessing whats going on.
Hardware options:
https://www.sparkfun.com/products/9717
https://www.adafruit.com/products/284
http://shrimping.it/blog/cp2102-kit/

